OTHER FEATURESUser Information:When you joined WebHosts Manager, you instantly became a part of our network and community. Your information shown to this community is fully customizable by you along with several other fields that effect your overall site functionality. Return to the main index Changing your user information One of the features of WebHosts Manager Sites enables you to change your password, name, email address and site name/description at any time. To change any user information, login to your File Manager and go to the bottom of the page where you will see a drop down list. Select "Change user info" from this list and click the "Submit Query" button. 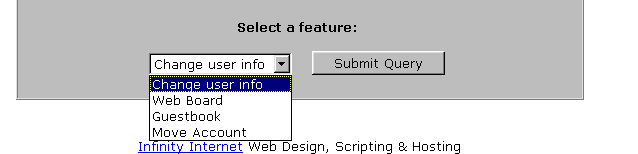 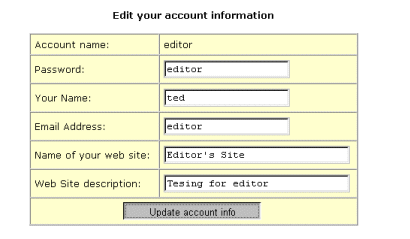 Return to the main index Changing your password Once you are on the change user information page, you have the ability to change your password by simply typing the new password into the password field and clicking the "Update Account Info" button. This will change your password for the File Manager, so write it down because our administrators may not be able to retrieve it for you if you lose it! Return to the main index Changing your Site Name/Description Every site created at WebHosts Manager can be viewed in our community search engine. If you want to change your listing information, you can do so under the user information page. To change your site information, simply fill in the Site Name and Site Description field and click the "Submit Query" button and the information will instantly be updated Return to the main index Free Space To check how much web space you have left on your account, login to the File Manager and scroll down to the bottom of the page. There should be a line telling you that #### used, ##### free space is left. This tells you just how much space your site and web board is taking up now and how much space is left on your account for you to use. To get more space, delete files or add more disk space here. 
Return to the main index If you are hosting your own domain, you can set up your own 404:File Not Found error page. To do this, create a file called missing.html in the root directory of your site. As long as it's called missing.html and it's in your root www directory, the server will display it whenever someone tries to access a page on your domain that does not exist. Return to the main index Most of our Members unzip files on their local computers before uploading. However it is possible to unzip files in your site using PHP. Here are the instructions:
Return to the main index
|

| Copyright |
Last modified: Sunday, July 26, 2026 | Legal & Privacy Notices |